Jan 30, 2014

how i hung grasscloth wallpaper

first, let me explain that i am not an expert on hanging wallpaper, and especially not an expert on hanging grasscloth. i have hung wallpaper before, but this is my first attempt with grasscloth. i have to say that i DID watch several you tube videos, and read a lot of tips online before i attempting this project, and i think that my research paid off! i am sure that an expert would have done an amazing job hanging this paper, but i am really happy with the way this project turned out as a DIY job.


here are the supplies that i used:
*paint to match the grasscloth
*paint brush
*wallpaper paste
*old paint brush for wallpaper paste
*x acto knife/utility knife + sharp scissors
*pencil
*push pins

the most important tip that i feel made a HUGE difference in the finished product was purchasing some paint that i had custom matched to the wallpaper. my space is small, and i only used about half of this 8oz sample.

first, i marked on my walls where all of my seams were.
i cut in a strip of the paint along the top and bottom of the wall, in the corners, and also on where all the seams were gong to be.  i read a lot of review from other DIY'ers who said that the seams were much more apparent than they had bargained for. painting the wall where the seams meet makes the seams virtually disappear when the paper is hung!


when i was ready to hang the paper, i put the paper where i wanted it, and held it in place with some push pins. this helped hold it up while i put the paste on the wall. i kept the push pins in place until the entire length of grasscloth was pasted.


i opted to coat the walls with paste, (versus coat the back of the paper), using an old brush. i think this was a very effective and easy way to hang the paper. i just had to make sure that the wall was thoroughly and evenly covered with paste. i worked in about 2 feet sections, starting at the top and working my way to the base molding.


then i smoothed the wallpaper with a smoother tool starting at the top, being sure to push out any air bubbles.

to figure out where the hole for the doorbell chime was, i measured on the wall where it was, and transferred the measurement to the paper before i hung it. i marked the outline of it with pencil.

then, i cut an "x" from corner to corner, and slipped the doorbell chime through it. once the paste dried, i trimmed the opening a bit more, and screwed it back into the wall, and replaced the painted cover.

here you can see how the painted area on the wall helps to camouflage the seams.

to cut holes for the outlets, the switch and the thermostat, i carefully cut an "x" at the location of each item as i moved my way down the paper. once the paper was smoothed out around each one, i used an xacto knife to better trim around them.

i had read that you have to use very sharp scissors in order to cut grasscloth, but after a few clumsy attempts at cutting the paper with scissors, i decided to use a utility knife with a fresh blade, which i found much easier.

i covered the switch plate using a scrap of grasscloth, and some duct tape...i just wrapped it like a present, and used an xacto knife to cut the opening for the switch.
once the outlet cover and switch plate were remounted, i dabbed some matching paint on the screws to help them blend in. 


is this  something that you would attempt at your own home? or would you call in the experts?


Jan 29, 2014

one week makeover: progress on my girls bathroom

a lot has happened in the last 2 days!

the mirrors were installed:


the crown molding went up in the room.


i bought some ikea ritva panels and added some fringe trim to the edges.

the extra long shower curtain is 12" longer than a regular shower curtain, and work well when using "regular" curtains as shower curtain panels.
(the curtains still need to be pressed!)


i picked out some mats for the artwork. since time and money are a constraint, i am using ikea ribba frames and getting new mats cut.


still to do:
*install the header.trim over the mirror.
*paint the new trim
*make the wood valance for over the tub...and install it!
*hang wallpaper
*install towel rings, toilet paper holder
*hang art
*accessorize

PS:
here is a better look at the wallpaper that i selected with the granite.

i hope it arrives in the mail today so that i can get it hung tomorrow!

Jan 27, 2014

one week makeover: my girls bathroom

man, am i excited to get this room underway! i am going to try to have this room DONE in the next 7 days. yep.
ONE week.
so buckle up.

here is the room now:

as you can see, it is pretty bare. a LOT needs to happen in order for it to feel done.

up first:
*installing + painting crown molding
*adding a mirror(s)
*finishing base molding around linen closet door

once these two big items are finished, all of the yummy layers can be brought in:
*wallpaper
*art
*new shower curtain and custom cut wood valance for the tub
*add towel rings
*accessories


here is the design board that i designed for the room:


you may note that i decided to go with the bolder wallpaper
there were two main reasons for this:

1. this space is small, and it is a room for teen girls. i thought the bolder print was a tiny bit more cheeky and fun. plus, there are plenty of openings on the wall and there will be three large pieces of art on the largest wall to break up the pattern.
2. that is the one that my girls prefer.

wish me luck!
i will be posting progress updates on instagram, if you want to follow me!

Jan 24, 2014

valentine link party

Valentine link party Design Dazzle Valentine's is such a fun, sweet and LOVEly holiday! It will be here soon - so we wanted to have a BIG GIANT Valentine Link party to celebrate! Nineteen of our favorite bloggers are participating. We know YOU have some awesome ideas to share! Simply link up your inspiring projects and creative ideas below. Feel free to link up new projects as well as any past projects that you want to share. At the end of our link party, we will feature some of our favorite Valentine projects and ideas! Link party runs from January 24 - February 3rd.

When you link up to our party, it will show up on ALL the following participating blogs:

Design Dazzle | Not Just a Mommy | | Uncommon Designs | Ginger Snap Crafts | a girl and a gluegun | Commona-My House | Confetti Sunshine | BellaGrey Designs | Clean and Scentsible | hoopla palooza | Giggles Galore | I Dig Pinterest | Happiness is Homemade | Paisley Petal Events |My Design Dump | Bloom Designs Online | Me & My Insanity | Bombshell Bling | Jojo & Eloise

Jan 22, 2014

do i dare? (animal print wallpaper)

the next project on my list is the upstairs bathroom that is shared by my two daughters. i am seriously considering some animal print wallpaper for the space, but have some (very) slight reservations.
here are the samples that i ordered:


here are my two favorites.

(i like that these two hold their own with the floors and counters...i felt like the lighter ones got lost.)

what do you think?
GO FOR IT?
do you have a favorite paper?
between my top two do you like the bolder one or the one that is a bit softer?

Jan 20, 2014

design plan: chinoiserie dining room 2 ways

sometimes even tiny tweaks in a room can yield big results.

here are two plans that i did for an e-design client that contain the same core elements:
*an existing traditional wood table
*matching chairs that will be painted 
*existing set of pagoda mirrors
*existing oil rubbed bronze chandelier that will be painted gold
*new end chairs 
*dark walls + new wainscoting + black ceiling tray

the big difference between the two plans is in the rug and accent fabrics. 


with this plan, an over dyed teal rug is paired with a chartreuse pagoda print and a geometric black/white fabric.

and this plan (which was the final look the homeowners decided on) has a more colorful rug, with fuchsia, eggplant, tangerine and mint. the new accent fabric picks up on the mint in the rug and adds another dose of geometric pattern.

interested in working together to create a more beautiful and functional space?
email me at autumnclemons @yahoo.com to set up a consultation!

Jan 16, 2014

diy stenciled grasscloth wallpaper


i have been coveting the phillip jeffries chain link printed grasscloth from the voyage collection for...like, ever. 


i wanted to use it somewhere in my house, but came across a few issues:
1. this stuff is EXPEN$IVE! dang.
2. there is a 2 roll minimum, which is way more than i would need for my mini space.

SO---i decided to make my own knock-off phillip jeffries printed grasscloth.

i am thrilled with the way this project turned out---and you will be happy to know that it is a totally easy, do-able diy project. 
no lie.

before:
remember what i started with?

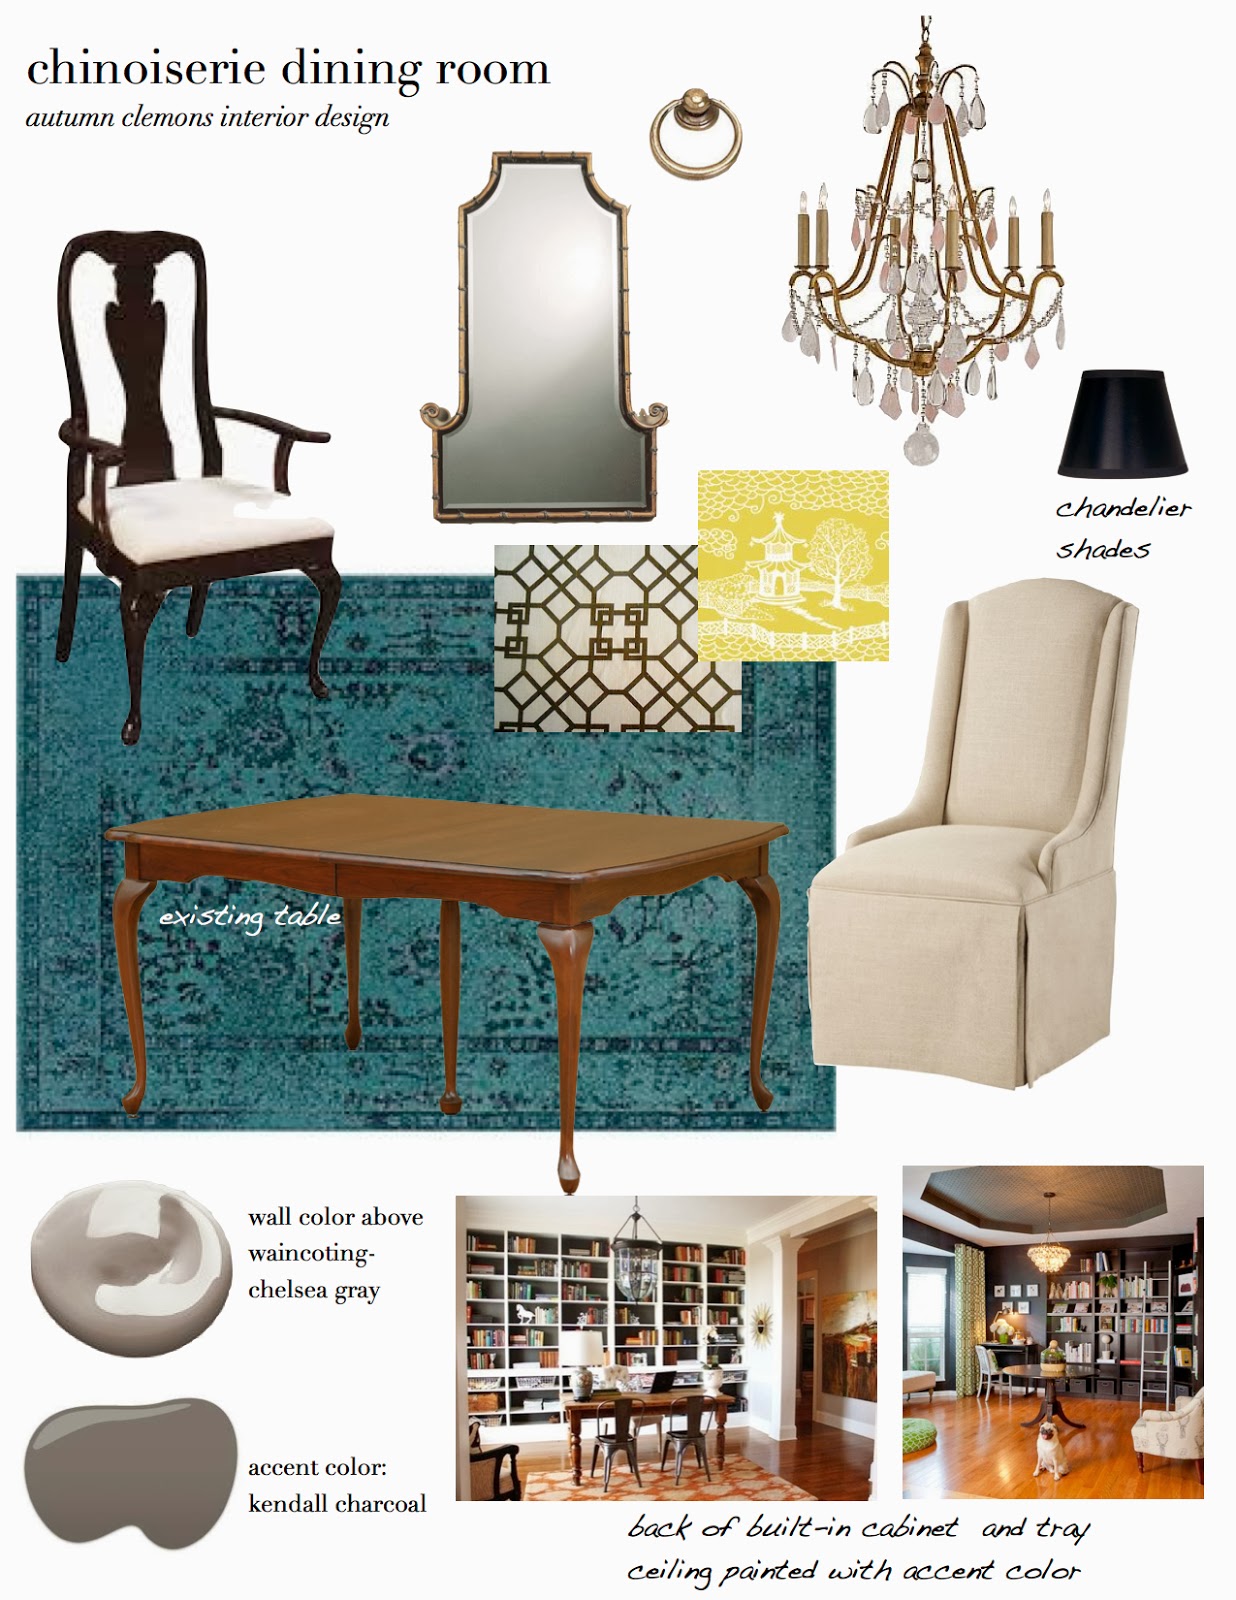
and here is the preliminary design plan:
as you might remember, i was trying to decide what to do with this little vestibule which leads to the master suite and the powder room. i so appreciate all of the votes on which wallpaper i should choose! i decided to opt for the stenciled grasscloth to save some money, since i already had a grasscloth remnant but i was VERY afraid that i was going to ruin it. honestly, i should not have worried so much. with a few basic pointers, it is an easy project to duplicate.
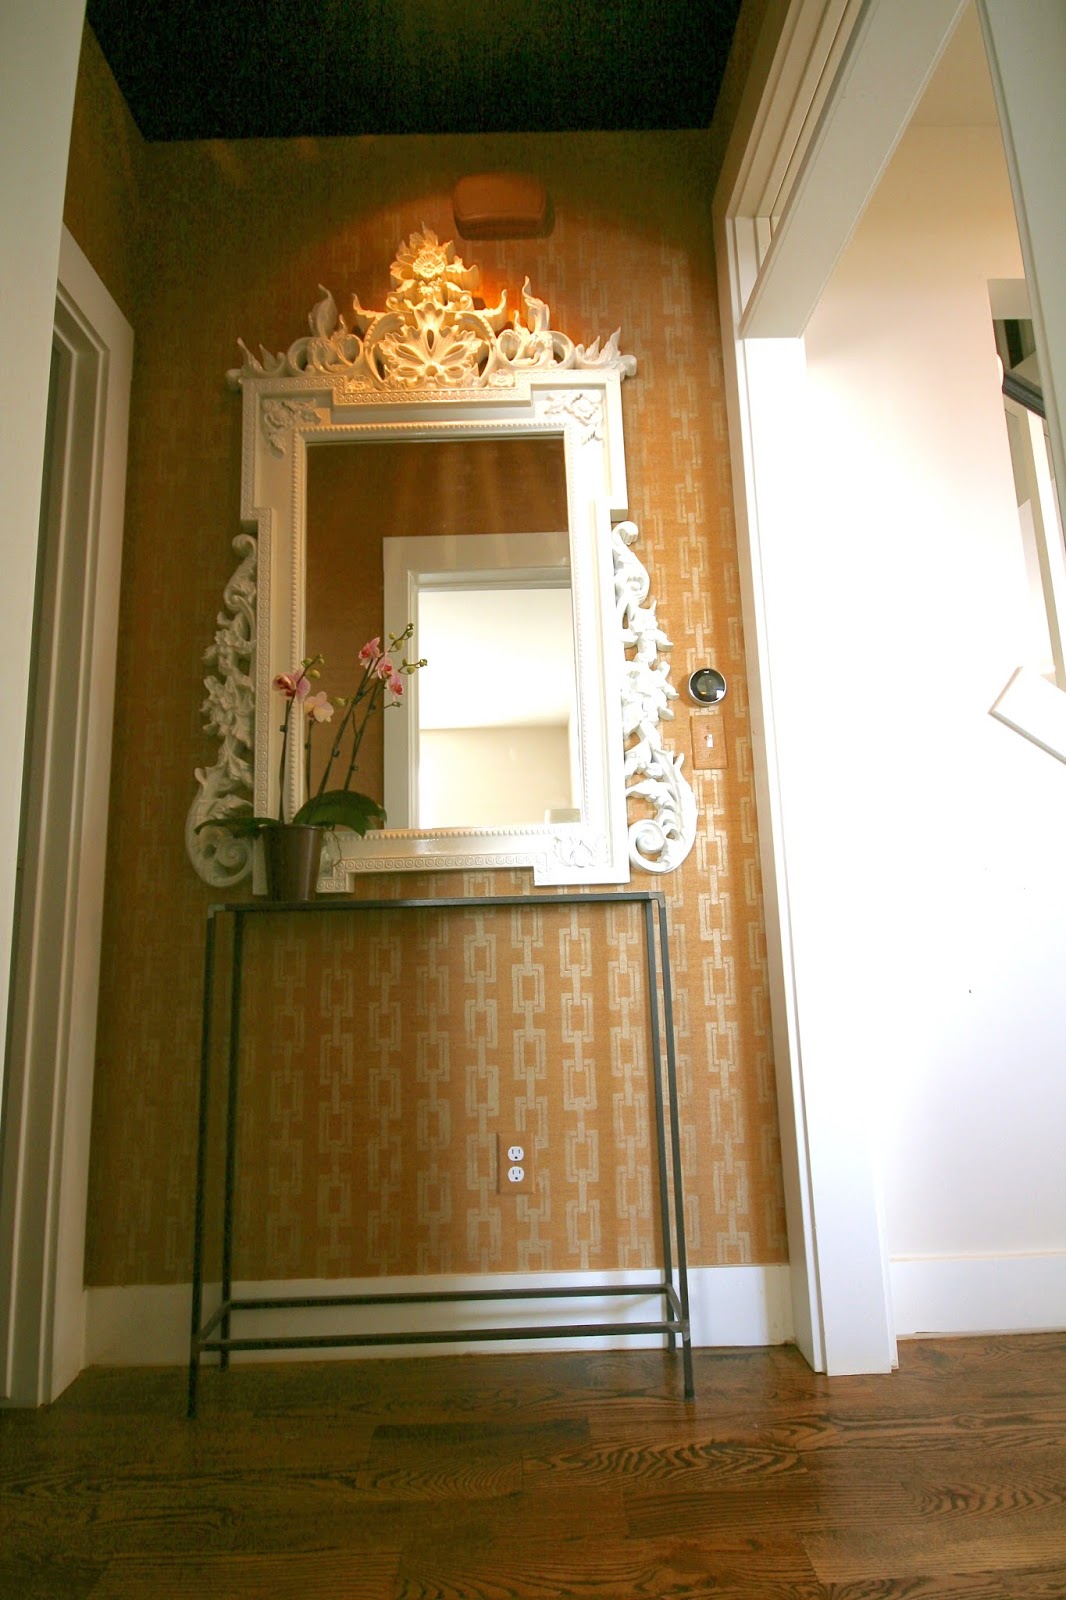
after:


want to tackle a similar project yourself?
here is what you will need:

(spray mount is also helpful for this project! it helps to keep the stencil in place.)

some more info:
* i scored my phillip jeffries grasscloth remnant on ebay for about $60, including shipping, but you could probably find some for less.
* the martha stewart metallic paint in "golden pearl" was the prefect opacity and color for this project! i like how it glimmers just a bit and has a slightly uneven look, plus it was a little more forgiving than a more "solid" color.
*i used the "modern chain link stencil" from stencil boss. 

how i did it:
first, i figured out how much paper i needed for the single wall that i was going to stencil. (i opted to only stencil one wall of my little space. the other walls each had a door or opening in them, and i figured it wasn't worth the hassle of having the pattern interrupted. plus, it was much easier to install!) i measured, and added 1/4" to each side and 3" to the length just to make sure i had enough. i used scissors to cut the paper. 

once i had the paper cut to size, i laid it down and taped the pieces together from the underside to keep them from shifting. (i kept the factory edges together to make sure my seam was straight and crisp--so, the pieces that i cut with the scissors are on the very outside.)

*i also placed a plastic drop cloth underneath everything to keep paint off my floors.

 i sprayed the back of my stencil with spray adhesive, and centered it on the grasscloth, making sure it was even on both sides. i thought that stenciling the grasscloth on the floor was MUCH easier than doing it on the wall, but if your grasscloth is already up, or you would rather hang it first, and then stencil, that would work too. (it is just hard to get in the corners and top/bottom without seriously cutting the stencil. you can read about my other experience with all over stencils here.)

 i dipped a small foam roller into my paint, and then rolled it on a cloth rag. this is a very important step! it helps to evenly distribute the paint and removes any excess which can get under your stencil and ruin the pattern.

 
using moderate pressure, i rolled over the top of the stencil. since grasscloth is an uneven and rather porous surface, it absorbs quite a bit of paint and took several passes to get an even distribution of paint.

 keep moving the stencil, being careful to keep it lined up with the previously stenciled area.
i found that by the time i was done with each section, the stencil was dry enough to move on to the next section, but i kept some paper under it (the paper lining that came with the stencil) under it until i was certain i had it in the correct place.


 the only time i that i thought the stencil started to look sloppy was when i was pushing too hard.
(see the area on the middle bottom?) two light coats is better than one heavy one!

the finished product, ready to hang. 
* i will be posting about my experiences with actually hanging the grasscloth soon.

here is the AFTER again!


i used spray mount, duct tape and an exacto blade to cover the switch plate. a super easy project---very similar to wrapping a present!

 
some matching paint (dabbed on with a small brush) helps to camouflage the screws.


i used some spray primer and the same matching paint to disguise the door bell chime.


WELL worth the time and effort! it blends in pretty well and lets the mirror and the wallpaper be the stars of this teeny space.


what do you think??

is this something that you would attempt in your own home?

do you think i made the right decision to just stencil one wall, or would you go ahead and stencil all of them?